
Before You Begin
Every submission is reviewed by a staff member, but they don’t have the pin in front of them like you do. Please fill in all fields with as much info as you can. Quality photos and descriptions are necessary for submission approval. If there’s something you don’t understand after reading through the PinPics “How to Take a Photo” Guide and this “Add a Pin” Guide, please don’t hesitate to contact us before submitting your pin(s).
The first step to adding your pin is to make sure that your pin isn’t already in the PinPics Database. It can’t always be helped, but a duplicate listing wastes time and skews search results. You might have to be creative with your searching, because a lot of pins don’t have good titles like the one you’re about to write.
Once you’ve read through the Photo Guide and have a good picture (or two) for your submission, you’re ready to start adding a pin. We recommend that you have the pin in front of you while typing, because you’ll need to describe details that you might not have noticed before.
Ready? Let’s Get Started!
Go to the Pin Database tab and select “Add a Pin” from the dropdown menu.

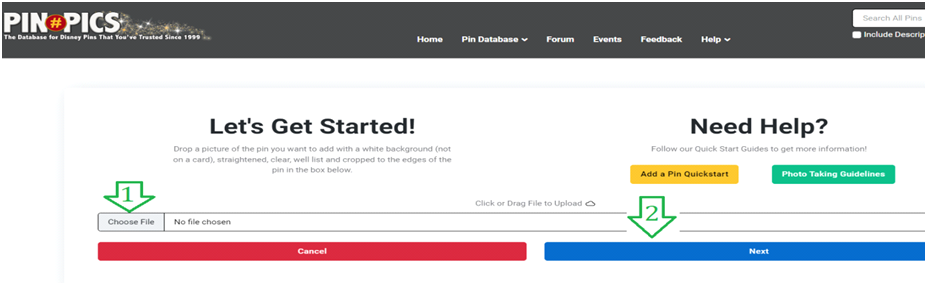
Click on “Choose File” (#1 arrow shown below), and a pop-up window appears that allows you to choose any .jpg or .jpeg file from your own device. Double-click or drag-and-drop to select your picture. Now, just click on the blue “Next” button (#2 arrow shown below) to move on to the next step.
If the photo looks good in the Image Preview screen, you have two choices at this point. If you’ve taken a second photo to add (e.g., back or inside hinged), click “Add Another Image”. It’ll return you to the screen shown above, where you’ll go through the same steps again and be returned to the Image Preview page. If you’re finished adding photos, just click on the green “Next” button under the preview.

FYI -- If you have a pin that’s already listed on PinPics but doesn’t have a photo of its back, please take one and e-mail it to info@pinpics.com. And don’t forget to include the pin number when you send the email!
At this point, you should be looking at the “Pin Details” page. This is where you get to list everything you know about the pin. The info that you share on this page is what triggers search results. The more info you add, the easier your pin will be to find!
TITLES
This is probably the most important thing you’ll add on this page. A good title is okay, but a great title is what you want to strive for. If a title is incomplete or doesn’t follow the specifics given below, it’ll be more difficult to find in the database (if you can find it at all). A poor title often results in duplicate listings or a pin not showing up in search results. And we all know how irritating that is. So, let’s go for the gold!
[Origin - Character - Name of Series, Set and/or Event – Words/Dates on Front of Pin - Details - Film Name]
This is a very basic template! No two pins are alike (even in a set), so no two titles should be the same, even if it’s just one word that changes. This isn’t the place to go hog-wild with description, though. Just try to get all the essentials into the Title. When you hit the Description areas, you can be as long-winded as you like!
TITLE ESSENTIALS
All elements in the Title should be separated by spacebar-hyphen-spacebar. This is really important to the search engines!
Hyphens, commas and apostrophes are the ONLY special keyboard characters allowed in the Title! No other punctuation (period or “/ : ; etc). Nothing you have to hit the shift key for [& ! ~ $ # @ * ( ) % © + etc]. This is really, really important for our site to work its best!
- The Origin is the first element in the Title. It will be either the place of release or the brand name. Please use the dropdown box to find the abbreviation or name that should be entered first on your title line. If the origin you choose is Multiple, do not enter anything in the Title and just move on.
- The Character(s) seen on the pin come next. If there’s more than one, make a list and separate two names with the word, “and”, and three or more with commas. For example, Judy Hopps [or] Bambi and Flower [or] LGM, Woody, Slinky Dog.
- If the pin is from a Series or Set with a specific name, that would come right after the character name(s). For example, Popcorn Buckets or Potted Plants or Signature. If the pin is a Chaser or Completer, put it here.
- Note: The word “set” should never be included in the title, unless the submission is for the entire set of pins. For example, “Kingdom of Cute Set” would only go in the title for a single listing of the entire set. If you’re submitting individual pins from that set, the title would only include “Kingdom of Cute”.
- If the pin was sold for a specific Event, it comes next. For example, Epcot Flower and Garden Festival 2023 or Mickey’s Very Merry Christmas Party 2020. This is one of those rare moments when you get to add the year to the title.
- If your pin has Words and Dates on the front, add it now. Use apostrophes here but no other punctation or quote marks. This is really important for search results. A member may not know the character on their pin, but they can always search for the words/date. Or you have a Pooh pin that says “You make me smile”. There’s only one of those in the database, but there are 3,400 Pooh pins.
- The next things in the title are Details that make this pin special. For example, Mystery, Starter, Booster, Passholder, Jumbo, Dangle, Hinged, etc. Tiny Kingdom pins should include the Edition and Series in the title.
- The last thing on the title line is the name of the Film the character’s found in, if it wasn’t already mentioned in the title. For example: for White Rabbit you would add Alice in Wonderland at the end; but for Cinderella or Mulan, you would not repeat the name.
A few examples of well-built Titles:
WDW – Tinker Bell – Summer Fairies - Mystery - Peter Pan
Disney Auctions – Jessica Rabbit – Sitting on Piano – Who Framed Roger Rabbit
DL – Timothy Q Mouse – Tiny Kingdom – Edition 3 – Series 2 – Dumbo
DL - Ursula - Villains - Chaser - Mystery - Little Mermaid
Sedesma – Robin Hood Set
WDW – Figment – EPCOT International Flower and Garden 2020 - Passholder
PIN DESCRIPTION FRONT

This is where you get to add all the descriptive words that didn’t go in the title. In this Front Description box, you’re going to describe the front of the pin. It’s really important that you do a thorough job here, because you’re the one with the pin. It’s difficult for an editor to add to a skimpy pin description when all they have is a small picture for reference. Numbers under 10 should be spelled out (e.g., “4 pins” should be “four pins”). Anything you put in the title should be included in this description box, but please do not just clipboard the title into this box!
Front Descriptions should include:
- who or what is on the pin;
- what they’re doing and wearing;
- the background design, color and shape;
- words and/or dates shown on the front, like you did in the title box, only this time add their location (e.g., bottom-right corner or on the top of the hat);
- name of the film the characters are from;
- name of the series or set, if the pin is part of one;
- number of random pins in each Mystery box;
- all moving parts and pin-on-pin or Free-D elements;
- areas of glitter, stained glass, dangles, etc.; and
-
real pin dimensions (inches, cm or mm) at the bottom.
It would be really helpful if Front Descriptions included:
- the name of an exclusive point of sale (e.g., Box Lunch Exclusive);
- complete list of who/what is on the pins in a series or set; and
- actual number of pins in a series or set, even if you’re only listing one of them.
PIN DESCRIPTION BACK
A back description of our pins is one of the things that makes PinPics a standout in the field of pin trading and cataloguing, so it’s essential that you include as many of these items as you find on the back of your pin. You’re the only one who can do this, because right now you’re the one with the pin! You’re welcome to clipboard the example shown below, modifying it to fit your pin, of course. And please don’t use the word “back” in your description. The box title already says “back”. Numbers under 10 should be spelled out (e.g., “4 pins” should be “four pins”). If you are submitting a single listing for an entire set, do not type anything into the Back Description box.
Back Descriptions should include any of these that you see (match capitalization):
- color (silver, gold, bronze, etc.);
- the pattern/finish (Mickey-head waffle pattern, sandblasted pebble finish, etc.);
- number of pin posts with barbs and/or nubs;
- Official Pin Trading [XXXX] logo (add year on back);
- all other logos;
- edition size;
- cubic Mickey;
- ©Disney;
- Made in XXXXX (add country name, English only); and
- only the word FAC at the end, if the pin has one (no number or number sign).
Sample: Silver Mickey-head waffle pattern. Single pin post with one nub. Two rivets. Official Pin Trading 2024 logo, cubic Mickey, Disneyland logo, Limited Release, ©DISNEY, MADE IN CHINA, FAC.
ORIGIN Dropdown Box
Just click on the name that fits your submission. It should match the name/word that you put first in your title. Remember, if you click Multiple here, then you should have put nothing in the title in front of the character’s name. If you click Other here (only because your origin is not on the dropdown list), put the appropriate name at the beginning of the title.
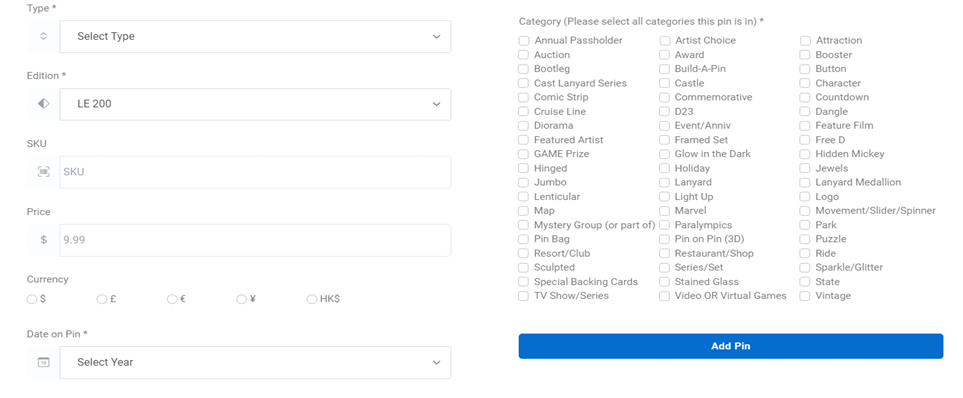
TYPE Dropdown Box
Choose whether you’re submitting a listing for a pin, button or merchandise (e.g., lanyard).
EDITION Dropdown Box
Open is the most commonly used option here. If your pin is marked “Limited Release” on the back, choose that option from the list. If your pin is marked “Limited Edition” followed by a certain number on the back (e.g., LIMITED EDITION OF 3000), choose that option from the list. You can either scroll through the dropdown box or start typing in the field until your choices come up. Occasionally, an odd LE number will show up on a pin. In that case, you can just type LE XXXX (fill that with your numbers) in the field box, and it’ll be added to your details page. If your pin doesn’t have an LR or LE # on the back, assume it’s an open edition.
INITIAL SELLING PRICE Dropdown Box
If you don’t know what the selling price was at the time of release, just leave this box empty. If you’ve got an individual pin (not from a set) and know the price, just choose your currency and enter the amount in the box. No dollars signs or currency symbols should be typed in this box. Those will automatically be inserted into the field when your submission is approved. Do not add quote marks in this field.
- If you’re submitting one listing for an entire set (other than Mystery Box), just enter the price of the set with no extra words, numbers or characters.
- If your individual pin was only ever available as part of a set (other than Mystery Box), then enter the price of the set followed by a slash and the word “set”. For example, “24.99/set”. If you don’t know the price of the set, leave this field blank.
- If you’re entering pins from a Mystery Box series (singles or full sets), then enter the price of each box followed by a slash and the word “box”. For example, “10.99/box”. And please make sure that your Description includes a sentence like, “Each Mystery Box contained X random pins.” (Replace the X with the number of pins in that particular box.)
- If your pin was only available as a gift if you spent so much money, then put GWP in the price area.
- If your pin was only available for you to purchase after spending so much money, then enter PWP.
- If your pin was only available as a prize for playing a game, then enter “Prize”.
- If your pin was an award and never available for sale, just enter “Award”.
DATE Dropdown Box
This should be the date on the back of the pin. Only if there is no date on the pin (DEC type pins, old pins, salesone, Loungefly, etc.) should you choose the release year from the dropdown box. If the release date is different than the date on the pin, then choose the date on the pin here and make a note about the difference in the Front Description box.
ATTRIBUTES
Select all the boxes that apply to this particular pin. Remember, these are PIN attributes, not character attributes. If a pin is part of a set or series, you should always check the Series/Set box.
Ready to Submit?
Before hitting that blue bar, take a quick look over the whole Details Page. When you’re ready, click on the ADD PIN bar at the bottom of the page. It’s as easy as that! If you forgot something, the system won’t let you add the pin, and the box that needs attention will be highlighted. Once your submission has been added, it goes to the Admin Approval team, and you’re free to add more! (Be warned, though, it can be addictive.)
Your fellow PinPics members thank you for your time. It’s volunteers like you who make this the great site it is!
-
 1
1